

Bring our Chatbot to Life: The User Interface

Empowering Website Conversations: Part 6
Introduction
In the preceding section, we crafted a reusable REST API to communicate with our fine-tuned models. Now, to interact with this API effectively, we need a user interface. Our approach involves creating a straightforward UI using React with TypeScript, leveraging Material UI components. The primary objective is to construct an intuitive chat interface that mimics real human interaction.
This task calls for the development of three key components:
- TypingIndicator: A chat message window designed to resemble someone typing.
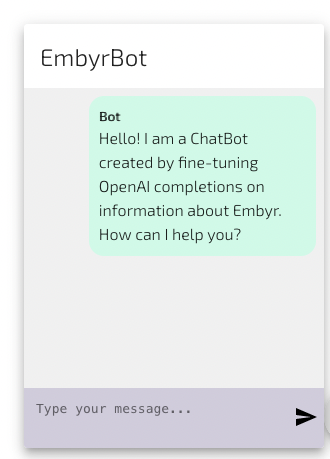
- ChatWindow: A comprehensive window housing user and chatbot messages, complete with a text input area and a submission button.
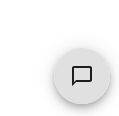
- ChatDialog: A popover that transforms into a button adorned with a message icon when closed, revealing the ChatWindow when opened.
The previous section can be found here.
Why React with Typescript
React is a popular choice for building user interfaces due to its component-based architecture and declarative syntax that simplifies development. It promotes reusability, maintains a vast and active community, and offers an extensive ecosystem of libraries and tools. React’s support for server-side rendering and mobile app development, along with performance optimization features and developer tools, makes it a versatile and powerful option for creating efficient and maintainable web and mobile applications. Its widespread adoption in the industry and strong community support further solidify its appeal.
TypeScript is a strongly typed programming language that builds on JavaScript. Using TypeScript with React offers the advantage of adding static typing, improving code quality and catching errors early. It provides robust tooling support, enhancing developer productivity, and offers better documentation through type annotations. This combination makes TypeScript a preferred choice for many, enhancing reliability and maintainability in React development.
Finally, we are also going to make use of Material UI. MUI provides a comprehensive library of pre-built, customizable UI components that follow Google’s Material Design principles. By combining MUI with React and TypeScript, you can accelerate development, maintain code consistency, and ensure type safety throughout your application.
To create a new React project run the following command:
npx create-react-app my-app --template typescript
If you created a React project without Typescript and want to convert it, this blog walks through the required changes.
The important files we will edit or add in our directory tree are the following:
src/
    components/
               ChatWindow.tsx
               ChatDialog.tsx
               TypingIndicator.tsx
    providers/
             ThemeProviders.tsx
    App.tsx
    index.css
    index.tsx
ThemeProvider
To provide a theme for our new React application, we will need to provide a MUI ThemeProvider. MUI components come with default themes that we’ll harness, but we’ll also incorporate inline adjustments within our component implementations. Our customization includes setting the font family to ‘Exo 2’ and making the background transparent. This design choice aligns with our intent for the chatbot to seamlessly overlay another website.
Add the following to src/providers/ThemeProviders.tsx:
import React, { useMemo } from 'react';

import {
  createTheme,
  ThemeProvider as MuiThemeProvider,
} from '@mui/material/styles';
import CssBaseline from '@mui/material/CssBaseline';

export default function ThemeProvider({
  children,
}: {
  children: React.ReactNode;
}) {
  const theme = useMemo(
    () =>
      createTheme({
        typography: {
          fontFamily: ['"Exo 2"', 'sans-serif'].join(','),
        },
        palette: {
          background: {
            default: 'transparent',
          },
        },
      }),
    [],
  );

  return (
    <MuiThemeProvider theme={theme}>
      <CssBaseline enableColorScheme />
      {children}
    </MuiThemeProvider>
  );
}
Make sure to import the Google font in our src/index.css:
@import url('https://fonts.googleapis.com/css2?family=Exo+2:wght@300&display=swap');

body {
  margin: 0;
  font-family: 'Exo 2', -apple-system, BlinkMacSystemFont, 'Segoe UI', 'Roboto',
    'Oxygen', 'Ubuntu', 'Cantarell', 'Fira Sans', 'Droid Sans', 'Helvetica Neue',
    sans-serif;
  -webkit-font-smoothing: antialiased;
  -moz-osx-font-smoothing: grayscale;
}

code {
  font-family: source-code-pro, Menlo, Monaco, Consolas, 'Courier New',
    monospace;
}
Now with our theme in place, we can start working on our components.
TypingIndicator
Our goal is to create a chatbot interaction that closely mimics a conversation with a real person. However, the delay in generating responses from the OpenAI API might give users the impression that something is amiss. To address this concern, we can incorporate a simulated typing indicator, providing users with visual feedback that progress is underway.
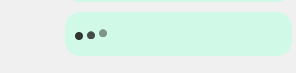
The following styles the typing indicator in the same way that messages from the
bot will be styled in the ChatWindow.
Add the following code to src/components/TypingIndicator.tsx:
import React, { useState, useEffect } from 'react';

export default function TypingIndicator() {
  const [showTypingIndicator, setShowTypingIndicator] = useState(false);
  const typingDotStyle = {
    display: 'inline-block',
    width: '8px',
    height: '8px',
    borderRadius: '50%',
    backgroundColor: '#333', // Adjust the color as desired
    marginRight: '4px', // Adjust the spacing between dots
    animation: '1.2s typing-dot ease-in-out infinite',
  };

  useEffect(() => {
    const typingTimer = setTimeout(() => {
      setShowTypingIndicator(true);
    }, 500); // Adjust the duration as needed

    return () => {
      clearTimeout(typingTimer);
    };
  }, []);

  return (
    <div>
      {showTypingIndicator && (
        <div
          className="chat-bubble"
          style=
        >
          <span className="dot" style={typingDotStyle} />
          <span className="dot" style={typingDotStyle} />
          <span className="dot" style={typingDotStyle} />
        </div>
      )}
    </div>
  );
}
Also add the following to src/index.css:
@keyframes typing-dot {
  15% {
    transform: translateY(-35%);
    opacity: 0.5;
  }
  30% {
    transform: translateY(0%);
    opacity: 1;
  }
}

.dot:nth-of-type(2) {
  animation-delay: 0.15s !important;
}
.dot:nth-of-type(3) {
  animation-delay: 0.25s !important;
}
ChatWindow
The central component of our UI is the ChatWindow. It encompasses crucial
elements: a title, user and bot messages, and a text area for submitting new
questions.
When a question is submitted and we await a response from the API, the
TypingIndicator becomes visible. To ensure a smooth user experience, a
useEffect function is employed to auto-scroll to the latest message when
added.
Furthermore, we’ve designed flexibility into the chatbot UI by enabling configuration via parameters. This allows for the reuse of the same chatbot UI instance across various scenarios and with different API instances.
Parameters:
- chat_url: The URL of the chat REST API for communication (Required).
- greeting: An optional initial message from the bot to display to the user.
- title: An optional custom title for the ChatWindow.
For example the following comes from the following URL:
http://localhost:3000/chatbot-ui?chat_url=http%3A%2F%2F127.0.0.1%3A8000%2Fchat&greeting=Hello!%20I%20am%20a%20ChatBot%20created%20by%20fine-tuning%20OpenAI%20completions%20on%20information%20about%20Embyr.%20How%20can%20I%20help%20you%3F&title=EmbyrBot
The component will take the prompt submitted in the textarea and submit it
against the provided chat_url when the send button is pressed via the
handleSubmit function.
Add the following to src/components/ChatWindow.tsx:
import React, { useState, useEffect, useRef } from 'react';
import { useLocation } from 'react-router-dom';
import { Alert, Card, CardHeader, Typography } from '@mui/material';
import SendIcon from '@mui/icons-material/Send';
import TypingIndicator from './TypingIndicator';

interface ChatMessage {
  sender: string;
  content: string;
  index: number;
}

type ResponseMessage = {
  data: {
    choice: string;
  };
};

type ErrorMessage = {
  status_code: number;
  message: string;
};

export default function ChatWindow() {
  const location = useLocation();
  const queryParams = new URLSearchParams(location.search);
  const chatUrl = queryParams.get('chat_url') || '';
  const openingMessage =
    queryParams.get('greeting') ||
    'Hello! I am a ChatBot created by fine-tuning OpenAI completions. How can I help you?';
  const title = queryParams.get('title') || 'ChatBot';

  const [messages, setMessages] = useState<ChatMessage[]>([
    { sender: 'Bot', content: openingMessage, index: 0 },
  ]);
  const [input, setInput] = useState('');
  const [errorMsg, setErrorMsg] = useState('');
  const [lastIndex, setLastIndex] = useState(1);
  const [waiting, setWaiting] = useState(false);

  const containerRef = useRef<HTMLDivElement>(null);

  useEffect(() => {
    // Scroll to the bottom after adding new content
    if (containerRef.current) {
      containerRef.current.scrollIntoView({ behavior: 'smooth' });
    }
  }, [messages, waiting]);

  if (chatUrl === '') {
    return (
      <Alert severity="error">
        No URL for the chat API (chat_url) has been set
      </Alert>
    );
  }

  const handleSubmit = async (e: React.FormEvent) => {
    e.preventDefault();
    if (input.trim() === '') return;
    setWaiting(true);

    const newMessage: ChatMessage = {
      sender: 'User',
      content: input,
      index: lastIndex + 1,
    };

    setMessages([...messages, newMessage]);
    setInput('');

    try {
      const response = await fetch(chatUrl, {
        method: 'POST',
        headers: {
          'Content-Type': 'application/json',
        },
        body: JSON.stringify({ prompt: input, temperature: 0.0 }),
      });

      if (!response.ok) {
        const errorMessage: ErrorMessage = await response.json();
        setErrorMsg(errorMessage.message);
        setWaiting(false);
        return;
      }

      const responseData: ResponseMessage = await response.json();
      const newResponse: ChatMessage = {
        sender: 'Bot',
        content: responseData.data.choice,
        index: lastIndex + 2,
      };
      setLastIndex(lastIndex + 2);
      setMessages([...messages, newMessage, newResponse]);
    } catch (error) {
      if (typeof error === 'string') {
        // set error message and disable the box
        setErrorMsg(error);
      } else if (error instanceof Error) {
        // set error message and disable the box
        setErrorMsg(error.message);
      }
    }

    setWaiting(false);
  };

  const handleKeyDown = (event: React.KeyboardEvent<HTMLTextAreaElement>) => {
    if (event.key === 'Enter' && !event.shiftKey) {
      event.preventDefault(); // Prevent default Enter key behavior (e.g., line break)
      handleSubmit(event); // Call your submit function
    }
  };

  return (
    <Card
      sx=
    >
      <CardHeader title={<Typography variant="h5">{title}</Typography>} />
      {errorMsg !== '' && <Alert severity="error">{errorMsg.toString()}</Alert>}
      <div className="chat-window">
        <div
          className="messages"
          style=
        >
          {messages.map((message) => (
            <div
              key={message.index}
              className="message"
              style=
            >
              <div
                className="sender"
                style=
              >
                {message.sender}
              </div>
              <div className="content">{message.content}</div>
            </div>
          ))}
          {waiting && <TypingIndicator />}
          <div
            ref={containerRef}
            style=
          />
        </div>

        <form
          onSubmit={handleSubmit}
          style=
        >
          <div style=>
            <textarea
              id="chat-input"
              value={input}
              onChange={(e) => setInput(e.target.value)}
              placeholder="Type your message..."
              onKeyDown={handleKeyDown}
              style=
            />
            <button
              type="submit"
              style=
            >
              <SendIcon />
            </button>
          </div>
        </form>
      </div>
    </Card>
  );
}
ChatDialog
The final component in our setup is the ChatDialog, which serves as a floating
action button (FAB). When users click this button, it triggers the appearance of
a Popover that houses the ChatWindow discussed earlier.
Add the following to src/components/ChatDialog.tsx:
import React, { useEffect } from 'react';
import { Fab, Popover } from '@mui/material';
import ChatBubbleOutlineIcon from '@mui/icons-material/ChatBubbleOutline';
import ChatWindow from './ChatWindow';

export default function ChatDialog() {
  const [anchorEl, setAnchorEl] = React.useState<HTMLButtonElement | null>(
    null,
  );
  const open = Boolean(anchorEl);

  const handlePopoverClick = (event: React.MouseEvent<HTMLButtonElement>) => {
    if (open) {
      setAnchorEl(null);
    } else {
      setAnchorEl(event.currentTarget);
    }
  };

  return (
    <div
      style=
      data-testid="chat-dialog"
    >
      <Fab
        aria-owns={open ? 'chat-dialog-popover' : undefined}
        aria-haspopup="true"
        onClick={handlePopoverClick}
      >
        <ChatBubbleOutlineIcon />
      </Fab>
      <Popover
        id="chat-dialog-popover"
        open={open}
        anchorEl={anchorEl}
        anchorOrigin=
        transformOrigin=
        onClose={handlePopoverClick}
        disableRestoreFocus
      >
        <ChatWindow />
      </Popover>
    </div>
  );
}
Add the ChatDialog to a /chatbot-ui route wrapped in our ThemeProvider to
src/App.tsx and update the src/index.tsx to use a BrowserRouter.
import { Routes, Route } from 'react-router-dom';
import ChatDialog from './components/ChatDialog';
import ThemeProvider from './providers/ThemeProvider';

export default function App() {
  return (
    <Routes>
      <Route
        path="/chatbot-ui"
        element={
          <ThemeProvider>
            <ChatDialog />
          </ThemeProvider>
        }
      />
    </Routes>
  );
}
import React from 'react';
import ReactDOM from 'react-dom/client';
import { BrowserRouter } from 'react-router-dom';
import './index.css';
import App from './App';
import reportWebVitals from './reportWebVitals';

const root = ReactDOM.createRoot(
  document.getElementById('root') as HTMLElement,
);
root.render(
  <React.StrictMode>
    <div>
      <main>
        <BrowserRouter>
          <App />
        </BrowserRouter>
      </main>
    </div>
  </React.StrictMode>,
);

// If you want to start measuring performance in your app, pass a function
// to log results (for example: reportWebVitals(console.log))
// or send to an analytics endpoint. Learn more: https://bit.ly/CRA-vitals
reportWebVitals();
You are ready to get chatting!
Conclusion
We’ve successfully crafted a user-friendly chatbot UI, providing our users with seamless access to our REST API and finely-tuned models. Interacting with it should be akin to conversing with a knowledgeable friend well-versed in all things Embyr! In the upcoming and final installment of our series, we’ll delve into integrating this chatbot UI into our existing website, explore essential ethical considerations, and brainstorm potential enhancements for our finely-tuned models. Stay tuned for an exciting conclusion to our journey!
Part 1: What are Chatbots, and why would I want one?
Part 2: From Markdown to Training Data?
Part 3: Fine-tune a Chatbot QA model
Part 4: Safeguard your Chatbot with Discriminators
Part 5: Develop your Chatbot REST API
Part 7: Empowering Website Conversations: Conclusion
Reference
How to use TypeScript with React: A tutorial with examples